Valentine's Day Stuffed Hearts
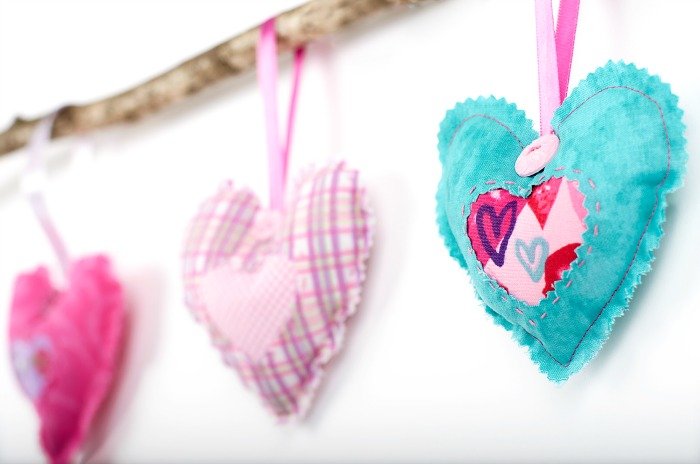
We’re spreading the love with a stuffed hearts tutorial!
Today we’re doing a little hand stitching to make these cute hearts.
Here’s our supplies list:
- Heart shape 4 inch pattern, your own design
- Pink or red fabric cut 5 in x 10 in Fabric Palette at AC Moore, Hobby Lobby or Meijer stores
- Pink or red center Fabric Palette scrap 2 1/2 in square
- Pinking sheers
- 1-sided fusible fleece (like Fairfield’s Smooth)
- DMC floss or perle cotton – colors to match or contrast & a crewel needle
- Button and satin ribbon to finish
- Iron
- Polyester fiber fill
Gather your Fabric Palette fabrics and let’s get started!
For the heart shape pattern, start with a 4 inch paper to fold and cut to your favorite heart shape. Designer Tip: If you have a computer with Word, you can draw a double heart shape. Use the pattern to cut out a one-sided fusible fleece heart. I love this stuff for totes, but also for holding hand stitching pieces together! It gives a nice, smooth finish to your heart when stuffed, too.
Our stuffed hearts are easy to sew, by machine or hand, or both! Here’s the details:Step 1: fold your fabric wrong sides together, then pin the heart to your fabric. Cut out around the edge with the pinking sheers. A wavy rotary blade will work, too, but be careful, please.
Step 2: fold the heart in half to cut out an inner heart. Draw it first on the wrong side. You won’t be using the tiny heart for anything, so toss it (eek!)
Step 3: trim the 2 1/2 in square fabric just a little to fit inside the peek-a-boo heart, and place it on the glue side of the fusible fleece.
Step 4: cover it with the heart and iron to secure. Use a simple running stitch to sew around the inner heart, stitching together the fleece, inner heart and large outer heart.
Step 5: auditioning a ribbon. If you want to, machine stitch it in place inside the heart now.
Step 6: sew the front and back hearts together, leaving room to stuff, then sew the opening.
To finish, stitch the ribbon to the back and a button to the front. Ta-da!
Mix and match your favorite colors and prints. Fill a basket, share them, hang them on a door or wall. Enjoy!
Happy Valentine’s wishes to you!
